Ipod Touch is one of Apple Inc.’s most promising gadgets. It is a portable media player that can play almost all media files at the utmost convenience of the users. Users may play music files, watch favorite movies, play games, and even read their books whenever they want to.
Users can also have the discretion on how will their iPod Touch appears. They can modify the device to match their own interests. They can adjust its screen properties, security options, and connectivity. For example, users can adjust the brightness, hue, and contrast of the device to watch their favorite music videos and films properly.
Apple Inc. also provides its customers the freedom to restore the original settings of iPod touch units. Once reformatted, the settings configured by Apple Inc. during the manufacture of the devices will be restored. However, the following must be considered by iPod Touch users when reformatting the device:
- Once reformatted, the files saved by the users will be removed.
- Backups must be created before the restoration of the device.
- Previous settings or configurations cannot be retrieved.
- There is no turning back once the iPod Touch is reformatted or restored.
If you are ready to take the above consequences, let met teach you the basic steps of how to reformat iPod touch. Before discussing the procedures, I need you to prepare the things to be needed first.
- iPod Touch
- Computer/Laptop with USB port and iTunes application
- Universal Serial Bus (USB) cable
Note: If you don’t have an iTunes application in your computer, you can download it at the official website of Apple Inc. at http://www.apple.com/itunes/download/.
Do you meet the above requirements? Before anything else, be sure that your iPod is fully charged and the version of the iTunes application you have is updated.
Here are the steps. Analyze them properly. I assume that you have already made backups of your important files.
- Connect your iPod touch to the computer/laptop using the USB cable which is included upon your purchase of the device.
- Open iTunes and choose iPod Touch in the side panel of the application under the devices option.
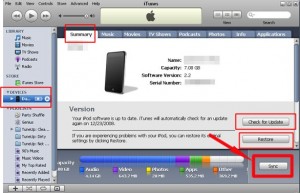
- Go to the Summary tab of the iTunes application.
- Once you are there, hit the “Check for Update” option.
- Choose the Restore button and follow the wizard for the restoration.
- Be sure that the process is not interrupted to avoid further damages.
Second Method:
The following steps are for advanced users only. If you don’t have ample technical knowledge, don’t dare using the method below.
- Connect the iPod touch on your computer.
- Turn on the power of the device.
- For five seconds, press the Home and Sleep/Wake button simultaneously until the boot logo of Apple Inc. appears.
- Once the Apple Inc. logo is loaded, release the Sleep/Wake button but don’t release the Home button yet.
- Doing so, the iPod Touch will be restarted thus implying the iTunes app know that the device is under the recovery mode.
- Repeat the steps of the first method.
Check Out These Too:
- Four Free iPod Touch Entertainment Apps That You Should Have Futurama Head in a Jar This is a ipod touch game, although very childish and silly, that people of all ages can enjoy. From the house of MTV Networks, this…
- How to Get free Internet WiFi on Your iPhone, iPod… The internet is one of most fascinating discoveries of all time. It serves as a number one killer of boredom. Do you know what I mean? We usually rely on…
- Apple likely to create bigger iPod Touch instead of… It seems Apple is likely to push deeper into low cost mobile computer system and they may release a larger version of iPod Touch player in 2010 instead of creating…
- How to Transfer Photos from PC to iPod Touch Everyone has their own favorite feature of the iPod Touch. Mine personally is the music feature (or rather, all the music features), but for many it's the ability to transfer…
- iPod Movie Downloads iPod Touch is a wonderful gadget of entertainment in the market and was released on last September 2007. Depending on the capacity of iPod memory you can store enormous data…
- Few Funny Things That iPhone 3.0 Software Supports Your iPod Touch is no doubt one of the best gadgets available around. But it can be made more livening and scintillating with the new iPhone 3.0 software in it.…
- iPod Music Transfer iPod Music Transfer. IPods are getting ever increasingly popular these days as the number one type of mp3 player. The latest music can be downloaded onto your iPod and now…
- IPod Touch Screen Protector for Maximum Protection You Want So what are you waiting for? Protect your Ipod Touch Now with Screen Protector! Apple iPod Touch has a superb 3.5 inch widescreen measurement. Apple iPod touch owners…
- TV.com App for iPod Touch You could spend a great deal of time searching the browser of your iPod Touch for your favorite television show so that you could watch it in that itty bitty…
- Winning Apple iPod Touch Software Winning Apple iPod Touch Software - Just like the earlier models of iPod, the iPod touch is as elegant and as capable as it looks. It efficiently works well with…
- How to Get Free WiFi On Your IPod Touch Anywhere How to Get Free WiFi On Your IPod Touch Anywhere - One of the best portable media devices of the planet is the iPod Touch. It is no wonder why…
- Pros and Cons of Jailbreaking Your iPod Touch or iPhone If you own an iPhone or an iPod Touch, you've probably heard that you can "jailbreak" it. But just what does this mean? And is it something that you want…
- How to Transfer Music From Computer to iPhone How to Transfer Music From Computer to iPhone - Are you struggling with transferring music from computer to iPhone? Don't worry, we are here to help! It's a common knowledge…
- Free Chess Game for iPod Free chess games for iPod bring a time honored game into a pocket-sized format, accessible on your iPod. If you are a chess buff, then free chess games for iPod…
- Free iPod Touch apps for Gamers; MetalStorm: Online One of the best games that has been released in the last few weeks for the iPod Touch and iPhone devices is something called MetalStorm online. The great thing about…
- How to Hack and Turn iPod Touch Into iPhone? How to Turn iPod Touch into iPhone IPod touch and iPhone are two of the latest devices manufactured by information technology (IT) specialist Apple Inc. These devices are already making…
- Best iPod Touch Downloads Resources With new generation iPods in the market it is very natural to depend on the gadget for most of our activities. Why not when the iPod is giving you so…
- Where You Can Find Rock Music Game for iPhone? Well there is music that you can download from iTunes this is a site that you can find all kinds of music to put on your iPhone and iPod touch.…
- Words for the iPod Touch Those who love Scrabble or just love word games in general will love the Words app for the iPod Touch. We brought you Words With Friends a few weeks ago…
- Enjoy More Fun and Excitement in your iPod Touch iPod is the latest and most popular gadget in today’s digital age. Almost everyone has an iPod from iPod shuffle, iPod nano, iPod video, or iPod touch. Besides from listening…
- How to Fix Ipod Touch Headphone Jack Problem The world without sounds is not good to live at all. Can you imagine a world wherein people don’t know how to talk? Dull, isn’t it? Like in the real…
- How to Transfer Music from iPod Touch to PS3 Transfer Music from iPod Touch to PS3 Do you own ipod touch or iphone and PS3 too? Do you need to add music from your ipod touch to your PS3?…
- What is Airport Express for the iPod Touch? If you want to take your iPhone or the iPod Touch and use it in a way that you never thought possible, then you might want to think about getting…
- A Few Ways to Charge Your iPod Touch without a Computer So you don't have access to a computer, but the battery on your iPod Touch is low, and you want to charge it. The good news is that there are…
- Apps: The Light amidst the Darkness of Boredom All work and no play make Jack a dull boy. This very famous adage had always been proven to be true through the centuries. That is mainly why Apple designed…
- How to Convert iTunes Flac to MP3 or Playing FLAC in iTunes? How to Convert iTunes Flac to MP3? FLAC stands for Free Lossless Audio Codec; it is another kind of audio format that is quite popular. You will be able to…
- iPod Shuffle Problems – Need Help To Fix It iPod Shuffle problems – need help to fix it Many iPod Shuffle users complain that every time a new playlist is generated, the iPod seems to choose the same songs…
- Use Simplify Media? You Might Want to Reinstall Your… People are always looking to free up storage space on their iPhone. After all, you don't want to lose any of the apps or music that you currently carry on…
- Accessorize your iPod Touch to Add Fun to it The iPod is now considered the utmost symbol of the electronics and digital age. The iPod touch is one of the hottest gadgets today and luckily, there are many companies…
- Skyfire Browser Hits iPhone and gets Pulled Instantly As a lot of you will already know, one of the problems that a lot of users have with the iPhone device is that it will not play flash videos.…